How to Prepare for a Roof Replacement Without Stress
Replacing a roof can seem like a daunting task, but with the right preparation and guidance, you can make the process much smoother. A new roof is not just a functional necessity but an investment in the long-term safety, energy efficiency, and aesthetic appeal of your home. This guide will break down each step of preparing for a roof replacement, offering in-depth advice on how to navigate the process and reduce any potential stress.
Step 1: Assess the Need for a Roof Replacement
Before you begin the process of replacing your roof, it’s crucial to determine whether a full replacement is absolutely necessary. Sometimes, roof repairs can suffice, but in other cases, replacing the roof may be the more cost-effective and long-term solution. Here’s how to assess your current roof’s condition:
Roof Age
Different roofing materials have different lifespans. Asphalt shingles, which are the most common roofing material in many homes, typically last between 20 and 25 years, depending on the quality of the shingles, the climate, and the maintenance they’ve received. If your roof is approaching or surpassing its expected lifespan, it’s more likely to suffer from issues that will require significant repairs or replacement. For metal, tile, or slate roofs, the lifespan can extend up to 50 years or more, but aging still impacts performance.
Key Tip: If your roof is older than 20 years, it’s likely time for a replacement. If it’s a high-end material like slate, it might last longer, but it’s still good practice to have it inspected periodically.
Visible Damage
Inspect your roof from both inside and outside. On the exterior, look for cracked, curled, or missing shingles. These are clear signs that the shingles have deteriorated. Look for granules from asphalt shingles collecting in gutters, which indicates significant wear. Inside, check the attic for signs of leaks or moisture damage. Water stains on ceilings or walls are often caused by leaks in the roof. If you can see daylight through your roof or if the attic feels unusually humid or damp, this could be a sign of major damage.
Key Tip: If you notice multiple signs of damage, such as missing shingles, leaks, or sagging, it may be more cost-effective to replace the roof rather than repairing it.
Energy Efficiency Concerns
An old or poorly insulated roof can lead to higher energy bills because it allows heat or cool air to escape. If you’ve noticed an increase in energy costs or your home feels too warm or cold even when your HVAC system is running efficiently, your roof could be to blame. A well-insulated roof helps maintain the temperature inside your home by preventing heat loss in the winter and heat gain in the summer.
Key Tip: When replacing your roof, consider upgrading insulation and ventilation as well. Proper ventilation helps reduce heat buildup and moisture problems that can lead to mold growth, extending the life of your new roof.
Roof Inspection by a Professional
Regardless of how much you may think you know about your roof, a professional roofer’s assessment is invaluable. A contractor will not only spot issues that may be invisible to the untrained eye, such as damaged underlayment, mold, or hidden leaks but can also help determine if a simple repair is enough or if replacement is the best course of action. Many roofing companies offer free or low-cost inspections, so take advantage of this service before committing to a replacement.
Key Tip: Schedule at least one professional inspection per year, particularly after heavy storms or seasons of extreme weather.
Step 2: Set a Budget for the Roof Replacement
A roof replacement is an expensive project, and without a clear budget, costs can spiral quickly. Establishing a comprehensive budget that includes not just materials and labor but also contingencies for unexpected issues will help you manage expenses and avoid stress later in the process.
Materials and Style
The materials you choose for your roof will play a significant role in determining the total cost. Asphalt shingles are the most cost-effective, with basic options priced relatively low, while premium shingles or architectural designs will cost more. More durable materials, like metal, tile, or slate, have a higher upfront cost but may save money over time due to their longer lifespans. Consider not just the initial price but also the long-term maintenance and replacement costs of different materials. For example, while slate may cost more upfront, it can last for up to 100 years, requiring little maintenance.
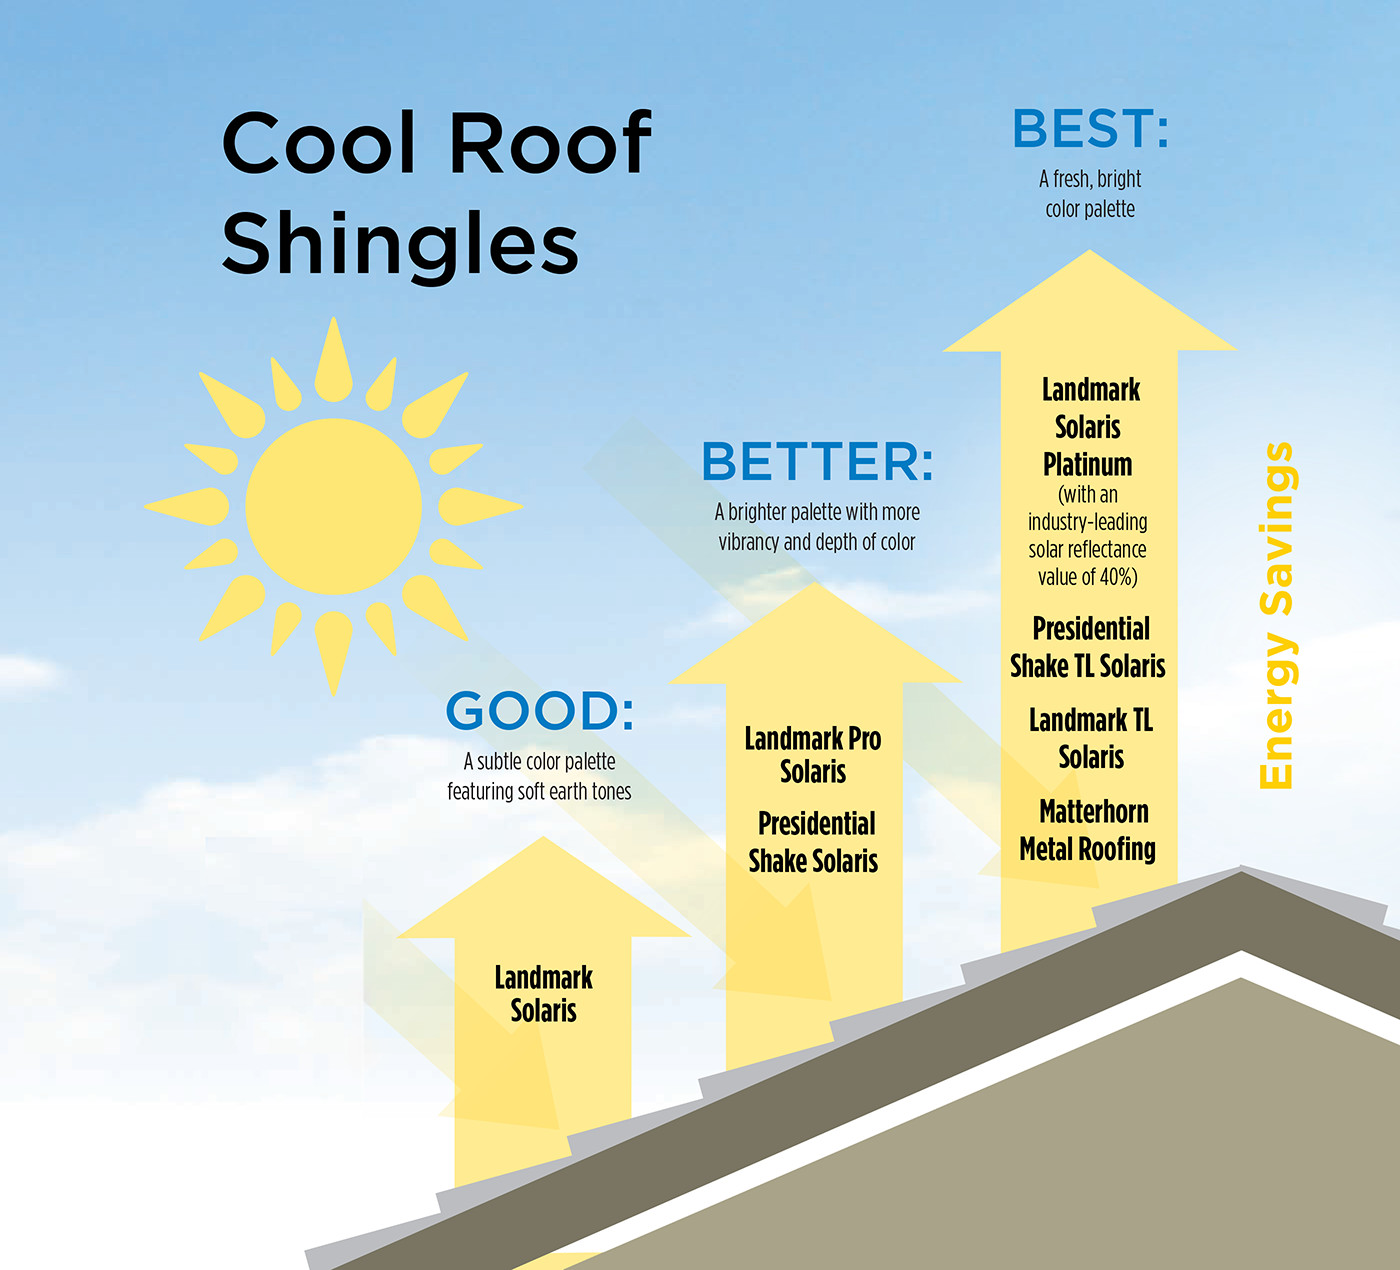
Key Tip: Consider energy-efficient roofing options like cool roofing, which reflects sunlight and reduces energy costs. While they can be pricier initially, they may save you money on energy bills in the long run.
Labor Costs
Labor is a major component of your total roofing costs. Labor costs can vary depending on the complexity of the project, the roof’s pitch, the materials used, and the region where you live. Contractors often charge by the square foot, and roofing specialists in urban areas or high-cost-of-living areas tend to have higher rates. To save money, try to get quotes from multiple contractors and be clear about the scope of the job, including how long the work will take and what’s included in the cost.
Key Tip: Get at least three quotes and ensure that each includes the same materials and scope of work for accurate comparisons. Be cautious of quotes that are significantly lower than others—they could be a sign of subpar quality.
Additional Expenses
There are several potential extra costs you may not have initially considered. These include the removal and disposal of old roofing materials, repairs to the underlying roof deck or structure, replacing flashing, adding new insulation, and updating attic ventilation. Some homes may also require structural adjustments to support the weight of new roofing materials.
Key Tip: Ask your contractor to break down all the costs involved, including any additional charges for unforeseen repairs. Make sure there are no hidden fees and that everything is agreed upon upfront.
Unexpected Costs
Even the best-prepared homeowners encounter unexpected costs. Once the old roof is removed, you may discover issues with the roof deck, structural damage, or mold that need to be addressed before the new roof can go up. These additional costs can add up, so it’s wise to set aside 10–20% of your total budget for contingencies.
Key Tip: Speak to your contractor about potential unforeseen costs. A reputable roofer will be transparent and will notify you if extra work is needed before it’s done.
Financing Options
Not everyone has the ability to pay for a new roof upfront. If necessary, consider financing options. Many contractors offer financing plans, or you may qualify for a home improvement loan or a line of credit. Just ensure that you fully understand the terms of any financing agreement, including interest rates and repayment schedules.
Key Tip: Compare financing offers from multiple sources, and ensure you understand how much you’ll be paying in total, including interest and fees.
Step 3: Choose the Right Roofing Contractor
The right contractor can make a world of difference in ensuring the roof replacement goes smoothly. With the large number of roofing companies available, selecting the right one can feel overwhelming, but a thorough vetting process can help you make the best choice.
Research and Recommendations
Begin by researching local roofing contractors. Ask for recommendations from friends, family, neighbors, or local online groups. Homeowners who have had recent roofing work done are often a great source of insight. Also, look up reviews online to gauge contractors’ reputations. Platforms like Google Reviews, Yelp, and Angie’s List provide reviews from real customers, which can be very helpful in evaluating a contractor’s reliability.
Key Tip: A well-recommended contractor with plenty of positive reviews is often a safer bet than one who offers unusually low prices or lacks a digital footprint.
Verify Credentials and Insurance
A roofing contractor must be licensed to work in your state or locality. A valid license ensures that the contractor adheres to local building codes and regulations. In addition to licensing, check that the contractor has proper insurance, including liability and workers’ compensation. This protects you if accidents happen or if the work results in damage to your home or property.
Key Tip: Always ask for proof of license and insurance before hiring a contractor. A reputable contractor will readily provide these documents.
Get Multiple Quotes
Never settle for the first estimate you receive. Ideally, get three or more quotes from different roofing contractors. This allows you to compare prices and understand the market rate for roof replacement in your area. Ensure that the quotes include a breakdown of all costs, including labor, materials, permits, and disposal.
Key Tip: Be wary of quotes that are too good to be true. Extremely low estimates can indicate inferior materials, inexperienced contractors, or hidden costs.
Ask About the Work Process
A reliable contractor should be able to walk you through the work process, from removal of the old roof to the final inspection. Ask about the estimated timeline, any potential delays, and the specific materials they will be using. It’s also helpful to know about their warranty policies and post-installation services, such as cleanup and follow-up inspections.
Key Tip: Make sure the contractor provides a written agreement that details the scope of work, the materials used, and any guarantees or warranties.
Review Portfolio and References
Before committing, ask the contractor for examples of previous work and references from past clients. A reputable contractor will be proud to share photographs of past projects and provide references who can speak to their quality of work.
Key Tip: Contact past clients and ask about their experience, including the quality of the work, the professionalism of the crew, and whether the project was completed on time and within budget.
Step 4: Plan for the Installation Day
Once you’ve selected your contractor and scheduled the roof replacement, it’s time to prepare for the installation day. Roof replacements are noisy, messy, and can be disruptive, so planning ahead can minimize stress.
Clear the Area Around Your Home
Roofing work can be messy, and you’ll want to give the crew ample space to work. Move vehicles, lawn furniture, garden tools, and any other obstacles from around your home’s exterior. Make sure the driveway is clear so that contractors can park trucks and move materials in and out easily.
Key Tip: If you have any outdoor plants or delicate landscaping near the house, consider covering them with tarps to protect them from falling debris.
Secure Pets and Children
Roofing work is noisy, and there will be workers on ladders and scaffolding. It’s important to keep pets and young children out of the work area to ensure their safety and to avoid causing them distress. Arrange for your pets to stay with a friend or in another room far from the work zone.
Key Tip: Let your neighbors know when the work will begin, especially if you live in close proximity to others. They may appreciate a heads-up about the noise and potential disruption.
Expect Noise and Disruption
Roof replacement can be noisy, especially during the tear-off phase when old shingles are being removed. There will be hammering, pounding, and other loud sounds as the new roof is installed. If you’re working from home or need quiet for other reasons, consider planning to be away during the installation.
Key Tip: If you work remotely, you may want to plan for the roofing work to occur when you’ll be out of the house or schedule your most important tasks before or after the roofing job is done.
Make Arrangements for Temporary Living
In rare cases, a roof replacement might take longer than expected, or there may be substantial disruptions. If you feel that the noise and debris will be overwhelming, you may want to plan for temporary living arrangements during the installation period. Staying with family or renting a temporary place for a few days can reduce stress and help you avoid the chaos of a major renovation.
Key Tip: Discuss the timeline with your contractor before work begins to get an accurate sense of how long the roof replacement will take. Unexpected delays can happen, so plan accordingly.
Ensure Proper Ventilation
While the roof is being replaced, there may be a buildup of heat and fumes inside the home, especially if insulation or other materials are being replaced as part of the project. Be sure to keep windows open and maintain good airflow in your home.
Key Tip: Avoid staying in rooms directly below the roof being worked on. This will help reduce the effects of heat and noise and ensure that air circulation is optimal during the replacement process.
Step 5: Monitor the Work Progress
Staying engaged with the roofing process is essential to ensure everything goes smoothly and that any problems are addressed promptly. Regular communication with your contractor can help avoid delays or misunderstandings.
Stay in Communication with Your Contractor
Make sure to stay in touch with your roofing contractor throughout the process. Whether via phone, text, or email, it’s important to keep the lines of communication open in case of any issues. Your contractor should keep you informed of the progress and let you know if any unexpected issues arise.
Key Tip: If something doesn’t seem right or if you have questions about the work, ask for clarification immediately to avoid misunderstandings later.
Ensure Quality Control
As the work progresses, take note of the quality of materials being used and the overall workmanship. While most contractors will do excellent work, it’s always good to check that the job is being done according to your contract and to industry standards.
Key Tip: Take pictures of the work throughout the process, particularly before and after the installation. This can serve as documentation in case there are any concerns later about the quality of the job.
Check for Safety Protocols
Roofing can be dangerous, so ensure that your contractor is following proper safety protocols. Workers should be wearing safety harnesses, using ladders properly, and following OSHA (Occupational Safety and Health Administration) standards for roofing. The work site should also be secured to prevent accidents.
Key Tip: If you’re unsure about safety measures, don’t hesitate to ask your contractor how they ensure safety during the project.
Step 6: Final Inspection and Completion
Once the roof is completed, you’ll want to do a thorough inspection to make sure everything is in order. Here’s what to look for during your final walkthrough:
Inspect the Roof
Before you sign off on the project, make sure to closely inspect the finished roof. Look for any signs of incomplete work, such as improperly sealed flashing, unaligned shingles, or unclean areas. If you see anything that looks like a potential problem, point it out to your contractor immediately.
Key Tip: Have a checklist ready when you conduct the final inspection. This will help ensure that you cover every part of the roof and can address any issues right away.
Examine the Cleanup
A reputable contractor will clean up the site thoroughly, including removing all old roofing materials, nails, and debris. Check the area around your home to ensure that no debris has been left behind and that the contractor has done a complete job.
Key Tip: Walk the perimeter of your home and check the yard for nails or other sharp objects. Roofing nails are often left behind and can cause injury or damage to vehicles and landscaping.
Review the Warranty
Make sure you understand the terms of the warranty for both the materials and the labor. Warranties often cover defects in materials or issues with the workmanship for a certain period, so review the details carefully to know what is covered and for how long.
Key Tip: Keep all paperwork, including the warranty details and any receipts, in a safe place for future reference.
Test the Roof for Leaks
After a significant rainstorm, inspect your roof to ensure no leaks are present. The first few months after installation are a critical time to detect potential issues. If leaks do appear, contact the contractor immediately for repairs.
Key Tip: Conduct an attic inspection during heavy rainfall to ensure no water is leaking through.
Conclusion
Preparing for a roof replacement can initially seem overwhelming, but by taking the right steps, you can ensure a smooth, stress-free experience. From properly assessing the need for a replacement to choosing the right contractor and planning for the installation day, each step you take in advance can reduce potential problems down the road. With the proper preparation and a focus on quality, your new roof will not only protect your home for years to come but also enhance its overall value and curb appeal.